Tuesday, August 3, 2010

New Apartment Tour

Well, I have officially moved. Moving was awwwweeessommme. Actually, I still have a few things at the other apartment--like a fan (don't need that anymore--new place has central air), an ironing board (ha!) and some other random stuff. Also I need to do a final cleaning and then I can turn in my keys and I'm officially moved!

I spent Saturday painting my bedroom and moving boxes myself with my car, and Sunday I had movers to move the big stuff and anything else that was ready to go. My couch is a little bit bigger than others, and it would NOT fit in the door way, no matter how the movers tried to angle it. In the end, we tied straps to the couch and hoisted it up over the balcony railing on the second floor. I only wish I had enough time to snap a picture of my 8 foot long 3 feet wide purple couch suspended up one story.

Anyway, I thought I would share photos of the rest of my new pad. You've already seen the balcony, but here is the front door. I think this area might need some work- at least some sweeping, a rug and maybe a plant. 

Immediately inside the door is a set of stairs. Its a narrow space, so it was hard to take a good picture of, but this is the best I could do.


Right at the top of the stairs and to the left is the main living area, with a HUGE closet on the right.


Seriously, that closet could fit a twin sized bed. If I organize it well, it can be my guest room! The living space is all open, which I love. And, it poses new decorating challenges. I have never decorated an open space like this. You can tell that they intend for the smaller area on the left side of the picture to be the dinning area (see the light fixture on the ceiling? How cute would a chandelier look there??). On one hand, that seems like it would be cute, but on the other, maybe its too easy? Maybe there is a better spot for the table?


Above is another shot of the living space. The hallway leads to the bathroom, bedroom and LAUNDRY ROOM!


First my bedroom- there is a sliding glass door that leads out to the balcony here. There is another in the living room, but I don't seem to have a picture of it. The bedroom is reasonable large, and has an excellent closet with lots of potential.


The bathroom and laundry room really aren't that pretty to look at (yet), but here they are:


And now back to the kitchen-- the kitchen has a lot more of several key things than my past apartments- DRAWERS, CABINETS, and COUNTER SPACE. It also features a dish washer and a garbage disposal! 


I have already painted my bedroom and am doing my best to get all the boxes emptied out. I will post about my bedroom in the coming days, by the end of the week at least. This has been a very tiring project so far, I've been far too tired to blog!

Thursday, July 29, 2010

Big News!

While the apartment I currently live in serves me well, my lease is up mid-august and I AM MOVING!!
This is awesome news for my blog, as decorating a new apartment will surely generate lots of material about which to write.
My current apartment has 2 bedrooms and is about 670 square feet. It also has wood floors in the bedrooms. It doesn't have any outdoor space or a dishwasher, and I have to pay to use the washer and dryer which are in the basement.
My new apartment is 1 bedroom, but 970 square feet, and has a balcony, dishwasher and washer/dryer IN UNIT! Both the living room and the bedroom have sliding doors that go out to the balcony. The kitchen/dinning/living room is one big open space. 
I'm super excited to work on decorating an outdoor space. Since I decided I would be moving, I've been paying super close attention to other bloggers posts about outdoor spaces. If I could choose anyone to come furnish my balcony for me, it would probably be Nicole from Making it Lovely- Infact, my inspiration for the bench/loveseat that I'm after is straight from her blog.
Nicole posted this picture just days after I had seen the same bench in Target, but we have had similar luck in tracking one down.
I found another contender, this time at JCPenney, but had similar issues- on backorder online, and not available in the store. Also this bench was quite a bit more pricey than the Target version and the Ikea option.


She then decided to go with two benches from Ikea, and I can't lie, I think thats a pretty solid option. The benches look very fetch on her front porch:


Could my balcony look like that?
I also wonder, could I use more than 2 of those benches as a sectional? I've always wanted a balcony that is like one featured on Style Channels show "Dress my Nest" with Thom Felicia. This outdoor space was designed for Audrina Patridge, of MTV's show "The Hills." Both her  space and her budget are bigger than what I have to work with, but it serves as excellent inspiration.


I think the important things to remember are: streamlined upholstered furniture, bold throw pillows, and accessories. I'm seriously excited to start working on this space!
I was able to get into my unit today to take a look (previously I had only seen units like it), and I took some pictures. I'm not going to share them all at once, but since we're talking about the balcony I figured I could share those.
I will be on the second floor. You can see the balcony is rather larger- according to the website it is 18'6 long and 5'4 wide. I probably would have guessed it is wider. As you can see, there are TWO sliding doors-- one in the living room and one in the bedroom. My cats are going to love running laps, I'm sure.
Below: Potential Balcony set up:

Tuesday, July 27, 2010

Welcome to My Home, Volume 2: Recent Thrifting Finds


I wanted to share some of my recent thrifting finds. I like to browse the Salvation Army, looking for treasures, which I sometimes find. This week I was particularly successful. After seeing it in several kitchens in blog land, I decided I needed to start my very own collection of colorful Pyrex dishes. Boy, was I in luck!! I found a Spring Blossom Green mixing bowl. Apparently collecting vintage pyrex is kind of a cult thing, there are several websites devoted to it- the one I used to identify the bowl I got is www.pyrexlove.com. In case anyone is looking to buy me a book to guide my collection, there is "PYREX: The Unauthorized Collector's Guide (Schiffer Book for Collectors)" available for sale.
This picture makes the bowl look particularly scratched- I think its just how the light is coming through. Regardless, Its a good start to my collection and will look nice in my cabinets or on my counter. Not bad for $2.99.

The second thing I found doesn't have a name...at least not that I know of. It's metal- perhaps bronze, it has a lid like a jar, but is also has cut outs. It is very pretty. I imagine using it on my dresser or in the bathroom, to store cotton balls, q-tips or even make up brushes. I really dig the cut out pattern--it reminds me of the lamp in the living room. This little gem cleaned up very nicely, and maybe, just maybe, will look even better after some spray paint. Kelly green, anyone? This baby was a little more expensive at $4.99, but I had to have it.


The last thing I bought is a pair of wooden candle sticks. Sure, they look silly now. But after a cleaning, a light sanding and some spray paint, they will look completely different. The hardest part here is deciding what color! I could go wimpy- white or black,or something more dramatic? Can't beat the price here at $1.99 for the pair.

Saturday, July 24, 2010

Trying my Hand with Jewelry

I love tortoise shell. I have long been in love with a certain tortoise shell watch by Michael Kors, although I have been unable to find it in person. I'm not entirely in need of a watch, although I wouldn't turn in down. Below is the original watch. 
In attempt to find a similar but not exact watch, I came across lots of (spendier) alternatives:

(how cool is that wrap one??)
I also looked for tortoise shell jewelry. This was a bit harder. I found two really good candidates, at Lands Ends:

In the end, the Lands End pieces were a little more pricey than I wanted (although much better than the MK watches). The bracelet was originally $49.50, although is now on sale for $26.99 (hmm, maybe I SHOULD buy it), and the necklace was $89.50, now $48.99. 
One day, I did find a decent candidate at Target for $7.49, and although its both a watch and tortoise shell, it quickly proved that its not what I want. It doesn't lay flat, a near deal breaker for a detail oriented person like myself.

So in the end, what did I do? Attempt to make one myself, of course. I found some beads at Michaels that are very close to what I wanted (although not a chain) and decided to DIY (or, DIM- do it myself). It really wasn't so hard, given the right tools. In addition to the wire, clasp and beads, I purchased a book with some instructions, a crimper (like pliers, specifically for beading), and crimp beads.

 In all, I spent about $50 but I have enough beads left over to make another piece, in addition to two clasps, lots of wire and of course the crimper and book. I am very happy with this investment, and of course happy that I am able to tell people that I made it. I've had comments about how it looks like its from Ann Taylor, etc, which of course pleases me. :) It was quite a quick project, I made it in one evening while watching tv (and even had to restring twice) and wore it out to dinner with friends the next night! 
Truth be told, I don't love the clasp, and I think its probably made for a necklace, so if I ever come across a better clasp I will restring once again.


Wednesday, June 16, 2010

Bench Redo

A couple weeks ago I found this bench at the Salvation Army. That particular day they were having a sale- if you bought a piece of furniture and took it that day, you got 30% off. This baby was marked $7.99, and lucky for me, they considered it furniture. I got to take it home for just about $5. 


I purchased 2 yards of brown zebra print fabric (WAY too much) from Joann's, a button covering kit, 10 yards of nail head trim (didn't need that much, but that's how it came), and an upholstery needle. I spent approximately $40 on these supplies, but I have many things left over for other projects.
It look me a couple hours to remove the original fabric-- tons of nails, thumb tacks and staples holding that stuff on. 

Once I got that off, I was lucky to discover a rather clean and intact seat. The structure of the seat itself seems to be pretty solid, I was expecting it to be questionable. 
 

It only took about two hours to recover, make the buttons and put them on, and add the nail head trim. These steps were all very easy! I was surprised. Putting the buttons on was probably the most time consuming step. I tried to tuft it a little- it was hard to achieve the level of tufting that I wanted. I think its something I can rework in the future, perhaps with some stronger thread.


The last step was to paint the legs of the bench. I cleaned them first (gross!) and then sanded, and used a dark brown paint with a shiny finish. I am honestly considering painting the legs black now because I don't think the brown is dark enough. The zebra print is brown, and the lighter brown paint makes it look more black.


The last part of the project (save potentially repainting the legs) is to figure out where this beauty is going to go. Franklin and Eleanor are enjoying using it in the living room as an elevated bed, so it may stay there for now. There is also the option if it becoming a foot rest/table in my office (with the chair that I bought with the intention of recovering). Now that I have tried my hand at recovering something, maybe I will attempt the chair!

Monday, June 7, 2010

Apartment Tour: Living Room

The next installment of my apartment tour is of my living room. The living room has been subject to some of my most time consuming and in depth projects. There is only one thing in my living room now that I had when I moved here not quite two years ago. Needless to say, the living room has been one large project since I moved in.

This is the left side of my living room. In the window you can see three hanging planters-- they are small metal buckets I got in the dollar section at Target, hanging from clear fishing line. I modeled this project after a project I saw to hang plants upside down. I was originally going to make some upside down planters, with the intention of getting the plants out of the reach of Franklin and Ellie, but I wasn't sure how the plants would hold up upside down. Ultimately I think this is a better solution--and they came in this lime green color straight from the store, no other work for me.
The vase shelves behind the couch are from Target, along with the green vase and the sparkly picks in the vase. These picks were part of Target's Christmas decorations and I immediately decided I needed them upon seeing them. I was good though, and waited until they were 50% off before I bought any. The picture leaning against the wall is actually a little tile with a picture of the Eiffel Tower on it, brought back from Paris from a good friend. The little animal next to the Eiffel Tower is from my boss at my last job in Chicago, from her trip to Mexico.
The silver lamp on the left side of the couch is a find from the Christmas Tree Shop. This lamp was originally in the office, but it has made its way out to the living room as I have rearranged lamps. It's hard to see in the above pictures, but the lamp on the right side of the couch is the Eiffel Tower!! I got this lamp as a Christmas gift a few years ago, but it is from Target. It started out with a red shade, but I recently replaced it with a white shade to match the other lamps in the room.
The table the Eiffel Tower is sitting on is one of my refinishing projects that I wrote about here. I got the table for a very small amount at the Salvation Army, brought it home and sanded, painted and polyurethaned it. I really like the shape of it and its clean lines.

One of the biggest projects I've done in the living room is the armoire. The armoire is really the project that started the blog. I bought it at the Salvation Army for under $75. It was cherry colored wood and had old, outdated hardware. It took me quite a while to sand it all, prime and paint the inside and outside, spray paint the existing hinges (because I could not find any others that were the correct shape) and replace the hardware. My apartment was literally taken over by this project for a couple weeks last summer. You can read more about this colossal project here, here here and here. Overall I am extremely proud of this project, and also it is a really functional piece of furniture. Not only does it hold my TV and DVD player, its also a great perch for kitties and an excellent place for my plants to get some sun.


On the other side of the room lives my my newest lamp acquisition (read more here and here), and my kitchen.
The bookcase was a purchase from a friend when he left Chicago after college (thanks Kenneth! I love it), and the other table is one I found on the side of the road. I love the detailing on the legs of the table. I actually had the table for several months in my office, unpainted. Then on the morning of this photshoot I decided I needed to paint and use it. I painted it black for this purpose, but I think one day I will do something a little more exciting with it. The Big Ben tower was a gift that goes along with the Eiffel tower. The plant is an African Violet-- I love how they flower, and I seem to be relatively successful in keeping them alive and happy. The basket is an inexpensive one from Target, and if you can see inside the basket- there are some glass orbs that were gifted to me as an 'apartment warming' present. I believe they are from the Christmas Tree Shop. The big awesome mirror above the table is a steal from Walmart. The mirror is about 2 X3, and I paid something crazy like $10 for it. I don't know if it was mismarked or just on sale, but it was an excellent find. This mirror was at one point my "headboard" but I like it much better in this location.

Well, I think that's all for the apartment tour! Rest assured I have many other things to share with you!

Saturday, June 5, 2010

Apartment Tour: Kitchen

The next room in my apartment tour is the kitchen. The kitchen is obviously the center of the apartment, but also a difficult one for me to decorate. When I moved into my apartment, the cabinets were two toned- dark brown doors and tan frames. I lived with them for quite a while as-is before I couldn't resist the urge to paint them anymore. Inspired by the many posts I see on various decorating and renovating blogs with beautiful white cabinets, I decided to paint my own cabinets white. I feel that it worked as planned- it looks much cleaner and brighter.
Before:
 After:
In the after picture you can also see my collection of pink, flowery plates (although this was taken before the addition of the Liberty of London plate.


Thursday, June 3, 2010

Welcome to My Home, Volume 1: Liberty of London for Target Mixing Bowls

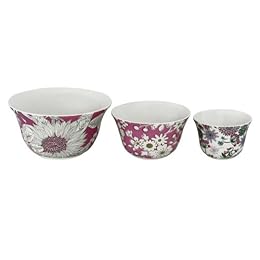
On a recent Target trip, I found a selection of Liberty of London items on clearance, including a set of mixing bowls and several plates, along with jewelry boxes, trays, lampshades and pillows. The mixing bowls immediately caught my eye because I think they are beautiful, and I had recently decided that I needed some serving dishes. As a bonus, they match the "theme" of pink and flowery that I have going in my kitchen. Needless to say, these babies came home with me, and have made an excellent addition to my kitchen. 

Target's website lists these as available for preorder, shipping June 11th.I think they must be getting a new shipment of them. In addition, they have three other color schemes available.


 Another thing I picked up was a pink, flowery salad plate to add to my wall. I was originally hesitant because the plate is plastic and I was afraid it would be obvious. I decided to take the risk because the plate was only $1 and I was sure I could find another use for it if necessary. Lucky for me, when I added the plate to the wall display, you couldn't tell at all. I was very happy!

(all pictures from www.target.com)