Showing posts with label michaels. Show all posts

Sunday, November 21, 2010

Some Winter Decorations

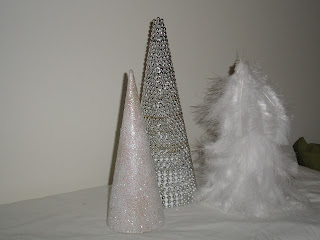
I can't really stomach calling this project "Christmas decorations" this early, and honestly, they're not for Christmas--they're for winter. I really like those feathered "trees" and wreathes that I've seen at stores the past couple seasons--Michaels, Joanns, even Target. Despite how much I like them, I just couldn't stomach the price these stores wanted. I've seen remakes of the wreath, but I don't recall any of the trees.

One day while browsing at Michaels, I came across some cardboard (Paper mache??) tree forms.
I bought three of them, because we all know to decorate in odd numbers, right?? (also, ignore the mess in the background of that picture.)
I also picked up two bags of white feathers. At first I was thinking maybe I would do three trees all with feathers, maybe of different colors. But then I decided to go in another direction, and do all silvery/white trees. Thus, I also picked up some white glitter and some silver strung beads meant for Christmas trees.
When I got home I gave them a quick spray with white spray paint, just in case the color shows through for some reason. 
Making the one with glitter was rather easy: cover that thing in glue and then shake on the glitter! 
The next one I tackled was the feathered one. I started at the bottom of the tree and hot glued the feathers around and around, moving up after I've finished a row. As you can see, Franklin was very interested in what I was doing. Or, he thought the feathers were a toy.
The feather tree used a surprising amount of feathers. I used about a bag and a half. 

Lastly I tackled the large tree. This one took the longest time and the most hot glue to complete. I simply wrapped the silver beads around, and around, and around, gluing gluing gluing. 
As you can see, when I started at the bottom of the tree, I wasn't paying a lot of attention to how the beads were stacking. Part way up I started squishing them together so there was much less white space showing. If I were insane and had tons of free time, I might try to remove all the beads and redo them. This tree took a lot of beads. I used three strings, all of which were about 6 feet long each. But, they are relatively cheap. I got two strings at Ikea, and the third at Target.

All together, I think they look pretty nice. My plan is to use them on my table, with some votive candles around them. Perhaps I will put this whole arrangement on a mirror to reflect the flame and silver even more.


Cost breakdown:
2 small trees: $1.99x2= $3.98
1 large tree- $2.50
glitter: unsure exactly- $2 maybe?
feathers- $1.99/bag x2= $3.98
silver beads- 3 strings at $2 each= $6
Total: $18.46 for THREE trees

vs ONE feathered tree on Amazon: 19.99 (and they claim this is 50% off)


Saturday, July 24, 2010

Trying my Hand with Jewelry

I love tortoise shell. I have long been in love with a certain tortoise shell watch by Michael Kors, although I have been unable to find it in person. I'm not entirely in need of a watch, although I wouldn't turn in down. Below is the original watch. 
In attempt to find a similar but not exact watch, I came across lots of (spendier) alternatives:

(how cool is that wrap one??)
I also looked for tortoise shell jewelry. This was a bit harder. I found two really good candidates, at Lands Ends:

In the end, the Lands End pieces were a little more pricey than I wanted (although much better than the MK watches). The bracelet was originally $49.50, although is now on sale for $26.99 (hmm, maybe I SHOULD buy it), and the necklace was $89.50, now $48.99. 
One day, I did find a decent candidate at Target for $7.49, and although its both a watch and tortoise shell, it quickly proved that its not what I want. It doesn't lay flat, a near deal breaker for a detail oriented person like myself.

So in the end, what did I do? Attempt to make one myself, of course. I found some beads at Michaels that are very close to what I wanted (although not a chain) and decided to DIY (or, DIM- do it myself). It really wasn't so hard, given the right tools. In addition to the wire, clasp and beads, I purchased a book with some instructions, a crimper (like pliers, specifically for beading), and crimp beads.

 In all, I spent about $50 but I have enough beads left over to make another piece, in addition to two clasps, lots of wire and of course the crimper and book. I am very happy with this investment, and of course happy that I am able to tell people that I made it. I've had comments about how it looks like its from Ann Taylor, etc, which of course pleases me. :) It was quite a quick project, I made it in one evening while watching tv (and even had to restring twice) and wore it out to dinner with friends the next night! 
Truth be told, I don't love the clasp, and I think its probably made for a necklace, so if I ever come across a better clasp I will restring once again.


Wednesday, March 31, 2010

Kitchen Shelves

At some point in the last few months I put up some shelves in my kitchen. I wanted to display some of my nicer dishes and vases, and also at the same time put something on the huge empty wall in the kitchen. The other walls have plates and baking dishes on them, so I was kind of out of options for the big wall.
I was prepared this time--since I was planning to get some customizable shelves from my favorite hardware store (Ace Barnes Hardware!!) I wanted to be sure to get the right size for the space. I measured the wall and approximately how high up I wanted the shelves. I decided at that point I wanted probably 2 shelves. Since my walls are white and I don't have a real color scheme in the kitchen, I decided to go with white shelving.
I got the metal rods, brackets and shelves very similar to whats pictured above. It was very easy to put up on the wall--it came with all the necessary hardware and only required a screwdriver.

I put my colorful collection of  vases and what not on the shelves at first:


Inspired by others dining room hutches and shelves I've seen in blogs, I decided to streamline and put only one color on the shelves. The collection started with the cow shaped creamer you can see in this picture. I added a vase I found at the salvation army, and one day I found a couple other vases at Michael's.


I am overall very happy with this look. Eventually I may spray paint some of the pieces to match the others more closely. The pitcher in the middle in particular is much more of a cream than a white. Another future change is to replace the college-style black metal cubes with a real buffet or cabinet. I've had my eye out for a long dresser at the Salvation Army that could be used in the kitchen, but so far I haven't had any luck.

Sunday, December 20, 2009

I don't want to brag but...

Pink christmas trees are totally cool this year.
And I've had one for like 4 years.

At Michael's last night, I saw they had light pink trees on sale for $19.99. I don't know how tall they were-- maybe 5 feet? If I had room for one and cats that didn't knock things over for sport, it would have been mine!

Friday, November 27, 2009

Candles!

Grad school has made me rather thrifty. This year for christmas I decided I wanted to make my female relatives (aunts, mom, stepmom, grandma) candles. Since I've had some time off to relax, and I had multiple coupons for JoAnns, I decided to try my luck at making candles today.

Last weekend I collected some old canning and jelly jars from the salvation army to make the candles in. I decided to get them there so they were not all the same, and I got some pretty ones. Different shapes, sizes and patterns.
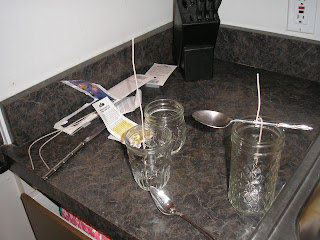
I got wax, wicks, dye and scent, and set to work. I don't have a fancy double-boiler candle maker thing, so I improvised. I read online that a coffee can would work, but I didn't have one of those either. I did, however, have a can of mandarin oranges. So I had a little snack, cleaned the can and started cooking! (kind of..)
I took action shots.
My high tech set up...


Three jars in various stages of getting ready: you have to put in the wick and then keep it standing while the candle hardens. They probably sell some fancy tool for this, but since I was using a can of mandarin oranges for melting the wax, I went with the low-tech "use a spoon" method. It actually worked out quite well.


I poured the tallest jar first, then I had to melt more wax to pour the next two. You can see the taller one is lighter than the smaller ones, and the wax continues to lighten as it cools.

This is about 30 minutes after pouring. You can see the wax is even lighter.

I used french vanilla scent and brown dye. Brown really wasn't my first choice, but Joanns had a limited, strange selection of colors. Lavender, yellow and brown. OK? I guess "french vanilla" lends itself to a brown color, so that's ok.
Since I wasn't sure how this was going to go, I only bought 1 pound of wax, which I used up. Tomorrow I will probably go to another store (Michaels?) to scope out their selection, and get some more wax. As the wax is drying, it settles, so you have to "top it off." I didn't plan well so I didn't have any wax left with which to do this. And I have many more candles to make.
I'm hoping to find one more color and maybe another scent. I don't want to get too complicated-- I have a limited supply of cans in my cupboard in which I can melt wax.
The best part about this is now I know how relatively easy it is. My new question, instead of "would this look good on my head?" will be "can I make this into a candle?"

Thursday, November 5, 2009

Jewelry I'm digging

After somehow making my way to the jewelry section of Anthropoligie's website, I fell in love. With their dramatic jewelry. If you've seen my other posts, you know that I'm not scared of a statement piece or two. I made the following cool little graphic of awesome jewelry from Anrthopologie (all still available, christmas is coming!) This is my first awesome little graphic, and my first time trying to post one to my blog to heres to hoping it works out.


Speaking of awesome jewelry, today while in Ann Taylor Loft I found an awesome necklace that I really needed, only it was 49.50, which is uh..49.50 more than my jewelry budget for this month. Even worse, its not on their website, and I can't find a picture anywhere!
I will try to describe:
It was a bib necklace, the main bib part was a black felt. There was a ribbon around the edge, and dark colored gems scattered on it. The chain was big plastic links.
I knew there was a Michael's across the street, and I knew I could cut out felt in a similar shape and glue sparkily stuff on it, so I decided to go see what I could find.
I got black felt, ribbon and a variety of fake rhinestones and shiny things. I was unable to find anything to make the chain part that pleased me, so I decided I would use ribbon instead.

(jewelry on a lamp? why not. Whitney has a belt on her plant)


Ok, maybe a picture will look better in daylight. But its a good start! I'm considering cutting the bib to make it more U-shaped...but I'm undecided.
It cost me about $12 to buy the supplies for this-- and I definitely have enough of everything to make another.

Sunday, November 1, 2009

Glittery Pumpkins!


It has been a long time since I posted last-- same story-- lots of school work. I have, however, done a few things since I last wrote.
To decorate for Halloween, I wanted to use glittery pink pumpkins. My inspiration came from a post on casasugar about decorating with orange and pink for Halloween. I thought, easy enough, I'll find something glittery at target or Michael's.
Not so much. So I decided I was going to have to do it myself. I bought tiny plastic pumpkins ("berry size" according to the package), glue and Martha Stewart pink glitter and went to work.
MS's glitter is amazing, first of all. It is very fine, giving it good coverage, but it is still everywhere in my apartment. The project took a little more time than I expected-- only one side of the pumpkin could be done at a time, then it had to dry, some had to be spot fixed, and then after they were dry, sprayed with hair spray to try to limit the amount of glitter that came off.
All in all it probably took me about 3 weeks to get the whole thing done-- not 3 full time weeks, but 3 weeks of spending a couple nights a week gluing and glittering while watching tv.


Glittery pumpkins or Halloween decorations isn't a new idea, its not even an unpopular idea.
Jane from Jane & Josephine initially motivated me. You can see her decor here. (she was featured on casasugar)

Martha Stewart even suggests that glittery bones are an elegant way to decorate for Halloween.


Even pottery barn is stocking glittered halloween decor.

Friday, June 19, 2009

Pillows


In the Fall I got a new cover for my comforter, brown. I also decided I wanted new sheets, and so I got a contrasting blue color. The blue is lovely, and only more lovely when with brown. However, when my bed is made there are no traces of the blue. So, I decided I needed to take an idea from Olivia Palmero's mirrored pillows. (http://www.jaysonhomeandgarden.com/product.php?productid=3520)
I set out to get what I needed--pillow filling (Ikea), fabric to match the current sheets, little mirrors to attach to pillows(Michaels)..
I found the pillow form at Ikea, and then decided to use pillow cases in the same color as the sheets on the bed to make these smaller pillows. This saved me some time sewing, right? So why not. I sewed the pillow form into the cut-down Target pillow cases, and sewed by hand the last side.
Then I worked to attach the small mirrors to the pillows. I was unable to come up with a good way of sewing them on, and ultimately tried a hot glue gun. This would have worked fine, if the pillows were never touched or used after the mirrors were hot glued on. The next thing I found was liquid stitch. I don't know much about liquid stitch, but it looks like glue, and is holding my mirrors on perfectly.