Tuesday, November 23, 2010

My Mother's Kitchen: The Beginning

So the kitchen at my mother's house has seen better days. It's rather outdated. And since I have been keeping up with blogs, seen lots of kitchen make overs, have a good imagination and am slightly ignorant about how hard this might be, I've decided that my mothers Christmas present this year will be a makeover for her kitchen. I unfortunately don't have any GREAT pictures of just the kitchen, so bear with me here.

Actually, several years ago while home from college for Christmas, I repainted the kitchen. The kitchen originally had wallpaper, so I stripped that and then painted. (Ignore all the clutter in the coming pictures, plllleeease)


So to explain. The counter tops are a lovely royal blue, the cabinets are a rather dark wood and the floor is in bad shape. I kind of dig the pattern, in a "it's vintage" kind of way, but the condition of the floor is just not good. It's one of those floors that never looks clean regardless of when you last cleaned it. One thing that is hard to see from these pictures is the "peninsula" (you know, like an island but against the wall on one side). It is exactly the same in terms of counters and cabinets.

So during that visit many years ago, I took down the wall paper (which you can see I've started in the above pictures) and repainted.


And just for good measure, here is a picture of my adorable brother, his puppy and the ugly floor:

So obviously I have my work cut out for me. I'll explain in detail what I'm planning to do in a future post (perhaps next week...), but first, I want to know--what DIY updates would you suggest I attempt?

Sunday, November 21, 2010

Some Winter Decorations

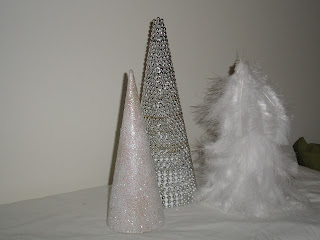
I can't really stomach calling this project "Christmas decorations" this early, and honestly, they're not for Christmas--they're for winter. I really like those feathered "trees" and wreathes that I've seen at stores the past couple seasons--Michaels, Joanns, even Target. Despite how much I like them, I just couldn't stomach the price these stores wanted. I've seen remakes of the wreath, but I don't recall any of the trees.

One day while browsing at Michaels, I came across some cardboard (Paper mache??) tree forms.
I bought three of them, because we all know to decorate in odd numbers, right?? (also, ignore the mess in the background of that picture.)
I also picked up two bags of white feathers. At first I was thinking maybe I would do three trees all with feathers, maybe of different colors. But then I decided to go in another direction, and do all silvery/white trees. Thus, I also picked up some white glitter and some silver strung beads meant for Christmas trees.
When I got home I gave them a quick spray with white spray paint, just in case the color shows through for some reason. 
Making the one with glitter was rather easy: cover that thing in glue and then shake on the glitter! 
The next one I tackled was the feathered one. I started at the bottom of the tree and hot glued the feathers around and around, moving up after I've finished a row. As you can see, Franklin was very interested in what I was doing. Or, he thought the feathers were a toy.
The feather tree used a surprising amount of feathers. I used about a bag and a half. 

Lastly I tackled the large tree. This one took the longest time and the most hot glue to complete. I simply wrapped the silver beads around, and around, and around, gluing gluing gluing. 
As you can see, when I started at the bottom of the tree, I wasn't paying a lot of attention to how the beads were stacking. Part way up I started squishing them together so there was much less white space showing. If I were insane and had tons of free time, I might try to remove all the beads and redo them. This tree took a lot of beads. I used three strings, all of which were about 6 feet long each. But, they are relatively cheap. I got two strings at Ikea, and the third at Target.

All together, I think they look pretty nice. My plan is to use them on my table, with some votive candles around them. Perhaps I will put this whole arrangement on a mirror to reflect the flame and silver even more.


Cost breakdown:
2 small trees: $1.99x2= $3.98
1 large tree- $2.50
glitter: unsure exactly- $2 maybe?
feathers- $1.99/bag x2= $3.98
silver beads- 3 strings at $2 each= $6
Total: $18.46 for THREE trees

vs ONE feathered tree on Amazon: 19.99 (and they claim this is 50% off)


Thursday, November 18, 2010

Completed Desk Area

Has it really been 2 weeks since I posted? Oops.

I've done some serious work on the "office area" in my bedroom over the last month or so.
First I showed you what it looked like currently here,
then I redid a chair I found and wrote about it here,
and I also left some clues about what else I was up to, in my post about my trip to Ikea. So how does my desk corner look now?

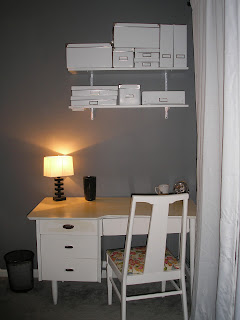
Well, I put up the white shelves that I used to have in my kitchen. Remember those?
(yuck, bad picture. I'd like to think I could do better...)

And after I put the shelves up, I decided I needed some matching boxes to store my supplies and papers. This is when my Ikea shopping trip came into play:


I think it looks pretty nice all together. The desk will mainly serve as the area for my sewing machine, but also my bills and other paper work go there.
I'm happy to have such a stylish place to do work!


Friday, November 5, 2010

Desk Chair

One of the things I've been looking for is a desk chair. I'm inspired by other's thrift store chair redo's, and decided to take one on myself. I have made a couple trips to the Salvation Army looking for a chair, but was unsuccessful. This past weekend, I made a trip to a new-to-me thrift store called "The ShareHouse" and found just what I was looking for:
She came home with me for a mere $7. Here Franklin is testing out the seat. He doesn't look very comfortable. And for good reason--the seat was dirty. In fact, the whole chair was. But that can be fixed.
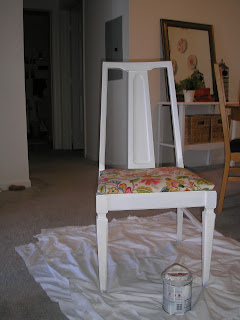
With a little sanding, priming, and painting, my chair frame was looking better than ever.  (The picture below is just the priming phase. I guess I didn't take any pictures of it after I painted...)


Some new pretty fabric on the seat really completes the look!

And just got good measure, here the new chair is in place at my desk.


Linked to:


Tuesday, November 2, 2010

Entryway Shelf Finale

When I left you last, the entryway self looked like this:
(if you missed it, look here)
I knew I wanted to do something different with this little shelf--something I hadn't tried before but had admired. Sunset Magazine had a tutorial on their website about how to update furniture using chevron, and the pictures really stuck with me. 

To be honest, at first I wasn't a fan. But as I saw chevron pop up more and more.
Nicole from Making it Lovely has a gorgeous Madeline Wienrib rug in her living room similar to this:

And this post/tutorial from Design*Sponge:

So can you guess what I did??
Yes, that's right. Chevron. 
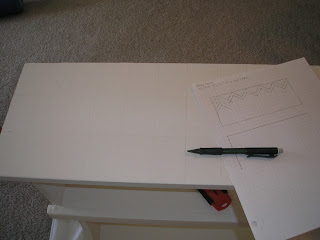
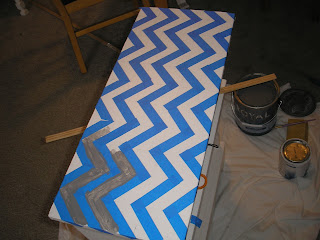
I started this part early on a Saturday morning. I started by drawing the pattern on some graph paper, and then drawing a grid on the shelf. After the grid, I used a straight edge (in this case, some left over trim from another project... What can I say? I'm thrifty like that) to draw in the diagonal lines, and then added tape.
This part took a long time. I needed my coffee to be with reach, and I had HGTV on while I was working. This really took me like 90 minutes-2 hours to get done. 
Then I started painting. For the stripes, I decided to use some leftover paint from my bedroom, as I am a use-what-I-have kind of girl.


After a second coat, I pulled off the tape to see how it looked. 


Not so bad!!

I put it down near the door, and Franklin tested it out. I staged the shelf a little, and it stayed like that until recently, when I decided I wanted to jump on the yellow and grey bandwagon. So, enter some yellow spray paint and a pot for the fake plant:

Before:

After:


Do you like it as much as I do? What do you think about chevron in decorating?

Linked to:

 HookingupwithHoH