Showing posts with label painting. Show all posts

Sunday, December 4, 2011

Painting Cabinets

When I moved into the condo, this is what the kitchen looked like- medium brown cabinets, faux butcher block counters, black appliances and yucky tan linoleum floors.


I decided that one of the first projects I would take up was painting the cabinets and adding knobs and drawer pulls. I'm not quite sure when I started it, because I've been working on so many things and kind of all at once...but this was an early project.

I wanted to paint the cabinets white, so I went to my favorite hardware store and bought some supplies. I could have gone the kit route, but I thought I could do just as good of a job myself. So I bought a gallon of oil based Kilz primer, and a gallon of Valspar's "Dove White" paint. It's nearly just the white straight off the shelf. I just wanted a white white. This has done the job.


In the mean time, I actually decided I would do the vanity in the bathroom first, as it is identical to the kitchen cabinets but smaller and that way if something went terribly wrong I wouldn't have wasted much time. I washed down the cabinets and set out priming. The can of Kilz said that you could re-coat after an hour, I think, but I let it dry for about 24 hours, until the next morning. 

I then did coats of the white paint. I did a coat, and gave it several hours to dry, then did another. Once I was satisfied with the coverage I let it dry for about 24 hours, and then added knobs to the cabinet doors.

The kitchen was a much bigger project, taking many more days and hours. At any given point, my kitchen look like this...

...or this...


Starting to see some progress...


And how it looks tonight, all finished!


Before:
 
After!

you are talking too much 

HookingupwithHoH


Monday, November 14, 2011

Kitchen Progress

I'm kind of torn about whether to show progress pictures or wait until its all done, but here they are.
One of the first projects I dove into upon moving in is painting the kitchen cabinets.
The cabinets were actually wood, but they were a medium brown that really didn't look great with the faux-butcher block counter tops.


I immediately knew I would be painting the cabinets white and adding some brushed nickel knobs and drawer pulls. So I was super anxious to start that project once I moved in.

I don't have a lot of "process" pictures, but here's what I did:
- washed the cabinets down really well with lysol or something similar
- did a light sanding 
- used Kilz oil based primer-- for most places I just did one coat, but where stains bled thru I did a second
- Then I brushed on a coat of Valspar paint called "Dove White". I didn't have a strong opinion about which white color I used, and I liked how this looked on the swatch so I just went for it. No planning.
-After the first coat I did another light sanding. Maybe a little heavier in places where there were imperfections or drips.
- Brushed on a second coat of Dove White.
- Let the doors dry for a couple days
- drilled holes and added knobs

At the same time, I was taking care of the hinges. I decided it wasn't in my budget to buy all new hinges, but the ones I had needed some work. They were like a dirty bronze color. I took them all down and gave them a scrub, then I spray painted them with Krylon's Satin Nickel spray paint. It took about thin two coats on each side to get them looking great! (Anyone else a Young House Love fan? Every time I started spraying I heard " If you’re a-sprayin’ your arm better be a-swayin" but its good advice!)

I started with the top cabinets ...because I wanted to.


BAM!

You can see the swatches behind the sink. I had the darnest time picking a color. At first I thought I would use Wild Aster, as I did in the living/dining areas, but after painting just a small portion (as seen on the wall behind the coffee maker) that color just wasn't doing it for me in this space. Next I thought maybe yellow, and picked up two samples from Lowes- I can't remember there names but one was a light yellow and the other a light greenish-yellow. Too pale.
Next I got a little more crazy and picked up the two samples at the other end of the paint chip from the first two yellow colors, which you can see in this picture.

Neither color was what I wanted. Both are too...yucky. So then I pulled out the samples I had used in my bedroom, and low and behold, I liked one! And even better, it happened to be the one I used in my bedroom! (The grey on the bottom right) So I went with that. The color looks totally different In the kitchen, I think.

In the midst of all this painting, I also installed some under-cabinet lights. So here is my final "progress" picture of the kitchen, walls painted, most cabinet doors installed, and some drawer hardware showing plus the under cabinet lights....
Other lights off


Other lights on- ignore the mess!!


Before:

After:

Can you believe that is the same kitchen? I am super, super excited about how good it is looking! And it will look even better when I get pictures with the remaining doors installed and get the mop out of sight!

Linking to:
 you are talking too much />


Monday, August 8, 2011

Since summer is going to start winding down very soon, I thought it was probably time to show you what  I did with my balcony this year.
Since I moved here in August last year, I only had a couple short months to use my balcony and then it was winter, so I was kind of starting from scratch this year.
I did find a nice little table at the end of last year, and repurposed a chair I previously used inside for more comfortable seating.

Just to refresh your memory- above is what my balcony looks like. I have two sliding doors- one in my living room (on the right) and one in my bedroom (the left). This is my first outdoor space and I am totally tickled with it.

I wanted to make the balcony more like an outdoor living room for this summer, and I wanted to think about decorating it like a room in my apartment (for some reason this is a strange concept to me. All my decorating knowledge goes out the window when I go outside)


In making the balcony a little more cohesive, I decided to first recover the little chair I had outside. 
Bad pic, sorry. It's the only one I can find!


This chair came from Ikea and originally had a red seat and flowered back cushions.
My sewing skills have definitely improved since this project, thanks to practice and a new machine!
One of my first sewing projects nearly 2 years ago was recovering it with some green geometric fabric. But this time I decided to go with purple ikat, an outdoor canvas from Joann's. 


The cushion is actually a box cushion, I made it with 3 pieces- top, bottom and the piece that goes around. I put invisible zippers in the pillows, but wasn't able to find a long enough zipper for the seat cushion, so I did it the old fashion way. It's hard to tell because the table is in the way, but this cover fits WAY better than the last. 

I also decided to re-purpose a bookcase I had inside as a plant stand outside. It was a dark brown color, but had seen better days. I decided I wanted to go with a contrasting color for the bookcase, so I picked out a rusty orange color at Ace Hardware. I only needed one paint sample to complete the bookcase.
Bookcase in previous life (stay tuned for an
update on that chair as well)
Bookcase now!

I put out the plants I had on hand that can handle the outdoors, all of which are in my white planters. Some of the planters are from Ikea, others are from a local gardening store. Overall, I think the white on orange is pretty spiffy, and the purple and orange go together swimmingly. I think I have made good progress with making my balcony feel more incorporated into my apartment and have got a ton of use of out it so far this summer.


I thought about making chair pads for the little bistro set that I have neglected to take a picture of (and its now too dark...), but in the end I decided that might be overkill, plus the chairs are fine as they are.
I would like to do something with that black table I have in front of the chair. Its placement more as a coffee table than a side table has been really convenient, but it doesn't really fit the feel of the rest of the space. Paint it, or make something else to go there?

Friday, July 8, 2011

Paint and Repaint

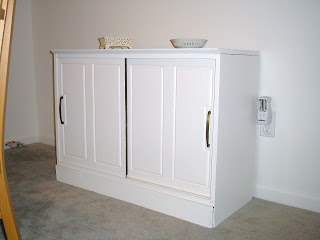
Back in September I bought and painted white a little cabinet for storage in my dining area. Well, it quickly got moved to behind my couch, to serve as a landing strip for mail, keys and other stuff that I have in my hands when I walk in the door.

I decided that while the white was nice, I needed a little punch of color in my life. Looking around at the other things in my living space, I decided turquoise was the color I needed. So I repainted this white cabinet with "La Fonda Turquoise" from Valspar.


I think the color really brightens up the room. It's one of the first things you see as you come up the stairs into my apartment, and it definitely makes a statement. I love it!


 This cabinet is actually small enough that I used just about 1.5 paint samples, making it extremely affordable. I had the first sample in my stash already for a previous project, so that was already paid for. I only had to shell out about $3 for this project!

Linked to:

Monday, April 18, 2011

Painting the Bathroom

So I had a week off about 3 weeks ago-- I got a new job and took a week off between. That week was pretty chocked full of projects in my apartment, and catching up on blog posts. One of those projects that I did was finally painting my bathroom. Since I have a shower curtain that I really love, I wanted whatever I did to work with that, but I also wanted to add a little interest. 
First I thought maybe I would use a stencil, since I have seen some stenciled walls that I absolutely love. But I couldn't decide on a stencil that wouldn't  compete with my shower curtain, or, I got lazy and felt unsure about the stenciling process.
My second idea was to do wide horizontal stripes. I wanted to do similar colors, perhaps a flat version and glossy version of the same color, or just slightly different colors. I've seen this done in many rooms that I absolutely love, for example, 


So I headed to Home Depot to pick out paint colors- planning a nice light tan color in maybe a matte and glossy finish. Well, I found something even more exciting than two different finishes-- I found Martha Stewart's Precious Metals paint! I got a quart of the precious metals color, and then I asked for it to be color matched to a regular semi-gloss color, of which I bought a gallon. The precious metals color is called bone, and I really, really love how it looks in my bathroom. It almost has a pink tint, making it look really warm and ahh I just love it!

I painted the semigloss version of bone as the base coat, and then used blue painters tape to put on the stripes. I wanted them to be big, so that if I was off an inch or so it wouldn't be obvious. I measured the height of my wall and decided to break it into 8 stripes of about 10 inches each, and obviously every other stripe would be painted with the precious metals paint. 

I first painted the base color along the tape to seal it, and then put up the precious metal color. At first I didn't think I was going to be able to tell the difference between the two finishes, but once I stepped out of the small bathroom for a minute and let my eyes rest, I could clearly see the difference.

This is where I moved the towel bar down...
and the aforementioned shower curtain that I wanted to keep
(note to self- close toilet bowl lid before taking pictures next time)


It's extremely hard to take pictures of my bathroom, as its quite small and kind of an L-shape. Also, it doesn't have any windows so regardless of the time of day, the light is poor. It was even more fun to paint it! Lots of  moving things around and strange angles. But I persevered and I'm VERY happy with the results!


Friday, January 28, 2011

Next Stop of the Bandwagon: My Home

Yes, I jumped on the Ikea Rast dresser redo bandwagon.
I just can't resist the amazingness of the various Rast dresser redos I have seen. For those of you who aren't aware, the Rast dresser is an unbelievable $29.99 at Ikea. It's an unfinished, 3-drawer small dresser and totally awesome.
The possibilities are endless. Here are a few makeovers of this dresser I have been drooling over:
Source
Source
It took me about 30 minutes to put together, and then I immediately primmed her. I'm still working on the final product so I'm going to keep my design plans quiet for now.
My Rast...