Showing posts with label entryway. Show all posts

Tuesday, November 2, 2010

Entryway Shelf Finale

When I left you last, the entryway self looked like this:
(if you missed it, look here)
I knew I wanted to do something different with this little shelf--something I hadn't tried before but had admired. Sunset Magazine had a tutorial on their website about how to update furniture using chevron, and the pictures really stuck with me. 

To be honest, at first I wasn't a fan. But as I saw chevron pop up more and more.
Nicole from Making it Lovely has a gorgeous Madeline Wienrib rug in her living room similar to this:

And this post/tutorial from Design*Sponge:

So can you guess what I did??
Yes, that's right. Chevron. 
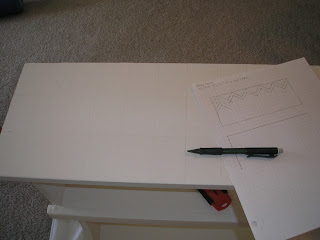
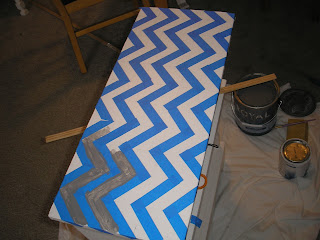
I started this part early on a Saturday morning. I started by drawing the pattern on some graph paper, and then drawing a grid on the shelf. After the grid, I used a straight edge (in this case, some left over trim from another project... What can I say? I'm thrifty like that) to draw in the diagonal lines, and then added tape.
This part took a long time. I needed my coffee to be with reach, and I had HGTV on while I was working. This really took me like 90 minutes-2 hours to get done. 
Then I started painting. For the stripes, I decided to use some leftover paint from my bedroom, as I am a use-what-I-have kind of girl.


After a second coat, I pulled off the tape to see how it looked. 


Not so bad!!

I put it down near the door, and Franklin tested it out. I staged the shelf a little, and it stayed like that until recently, when I decided I wanted to jump on the yellow and grey bandwagon. So, enter some yellow spray paint and a pot for the fake plant:

Before:

After:


Do you like it as much as I do? What do you think about chevron in decorating?

Linked to:

 HookingupwithHoH 


Sunday, October 31, 2010

Entryway shelf

At the end of the last post, I showed a picture of an upcoming project... Well, that project is here. In sprucing up my entryway, I decided I needed a little shelf to put just next to the door to set my purse, keys and whatever else I'm carrying down while putting away my coat. The area is small. Very small. I thought maybe I'd find a phone stand or something like that at the Salvation Army for a good price. Well, I didn't find a phone stand, but I did find this beauty:


Ah, yes. Everyone's favorite nursery rhyme line:
"Twinkle twinkle little star, how I wonder where you ar"
(yes, they ran out of space and omitted the "e")


Beautiful, right? I found it in the kids section, as it was obviously part of a nursery or kid's room of some sort. It didn't have a price on it, so I brought it up to the cashier to ask for a price, and she said "You want....that?" Hehe. 
Let me explain. You might be able to tell from the photos- but this papered with gold and starred WRAPPING PAPER, and I'm fairly certain elmer's glue. It was a mess. 

The first thing I had to do to this beauty was strip the wrapping paper. Unwrap it. Like a present. And that wasn't easy- the paper was thin and so it didn't come up nicely in strips. Also the glue was strange..messy. It took me a couple nights to completely strip it, using hot water, hot water mixed with some fabric softener, a putty knife and a razor blade. The hot water/fabric softener is something my mom used to use when stripping wallpaper. It smells a lot better than using vinegar (the other thing mom used), and I don't have access to a steamer. The hot water worked reasonably well, but I definitely would have needed something better if it was more paper to remove.

The only way to really get this done was just to go for it, on the kitchen floor, not worrying about it getting at the floor. I just mopped the floor really well after. This little beauty had another present for me under that wrapping paper--seriously cracking and peeling paint. After I got all the paper off, I went to work sanding. I did TONS of sanding. Tons. And after I sanded a ton, I sanded some more.
When I was finally satisfied with the sanding, I broke out the primer and got to work. The gold paint on the front was actually harder to hide than I expected, so I did two coats of primer.
Ahh, already looking better. I'll finish telling you what I did to this baby later this week!


Thursday, October 28, 2010

Entryway

While my apartment is technically on the second floor, my entrance is on the first floor, with a tiny little foyer and the staircase that goes up to the rest of the apartment.  At the top of the stairs is the large, bedroom-sized closet. When I originally moved in, I put all of my coats and hats and mittens in this closet...however it very soon became apparent that this setup wasn't going to work. The place to hang things in this closet is in the back. And the space between the back and the door is usually filled, or at least not always easily traveled.
  
Since I'm usually in a rush to get out the door in the morning, and it will only get worse as the winter comes, I knew I needed to do something else. I first tried putting my coat tree in the "nook" behind the door in the entryway downstairs, but it didn't work for me.

Before: Leftover plywood from my headboard,
my sewing machine and testing the coat tree out

See how tall the space is??


I decided what I needed to do was put in a rod across the nook to hang coats on, and put a shelf above the rod to store my hats, mittens, scarfs, etc. 

I decided I wanted to go the 'built in' look, so I got some wood to use as supports for the sides, and a precut shelf. I put the trim on the three sides of the nook, and then set the shelf on top and screwed it in. I'll be honest, this didn't turn out exactly as pretty as I imagined, but it is working out amazingly.
With the shelf
Next I need to get rid of the plywood thats left over (anyone want a headboard??) and perhaps do some other decorating up the stairway. I actually have another project in progress for the entry way, and I'll leave you with this teaser:


HookingupwithHoH