Tuesday, September 28, 2010

New purchase and more painting!

At the same time that I was re-vamping the table on the left side of my dinning area, I was looking for a buffet of some sort to put on the right side of the dinning area. I've seen some amazing redos recently that have fueled my fire. For example, this one from Brooke at The Crafting Chicks-
Before:

After:
 Amazing, right??

Unfortunately, as much as I would love a full china cabinet to redo  I simply don't think I have the space for it without making my dining area feel cluttered. And I really don't want a cluttered space. So instead I was looking for a buffet without a hutch.
In a perfect world, I would find a gorgeous mid-century modern buffet with lovely hairpin legs...but I'm also working on a budget. If I had hundreds of dollars to work with here, this would be no challenge.
I also would prefer something that is actual wood.
Well, I lucked out one day on an impromptu trip to a thrift store I have never been to. It's called the Ann Arbor PTO thrift store, and as you might guess, it's run by the PTO for the school district in Ann Arbor. All of their proceeds go to the school. So in addition to getting awesome thrifty goods, I'm supporting the schools.
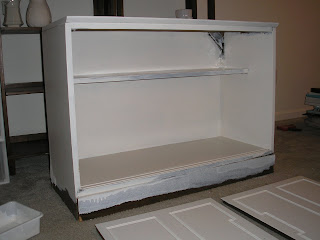
I found a small (perhaps smaller than I would like) cabinet marked "tv stand" for get this-- $10. It was kind of rough looking, but if I know anything, its that a couple coats of paint can seriously change the look of ugly furniture.
Here she is, minus the doors but with all the dust
For $10, I couldn't resist, and she was immediately put in my car. On the way home I stopped to get some important supplies--some primer (Kilz, of course), a paint brush and some new rollers. I got home and immediately got to work cleaning, sanding and priming this baby. Just the primer was an improvement. For the paint-- of course I turned once again to my $5 gallon of bone white. I think I may actually only get one more project out of this gallon, and then I will have to buy another. I suppose I have got my moneys worth.
Painting progress
The Doors

The Finished product:

The hardware is the original hardware, I just cleaned it up a little. I can see maybe I need to paint the side of the door there, and perhaps some caulking around the top there.
Given how short it is, I'm playing with the idea of adding small legs (about 3 inches) to the bottom to raise it more to a true "buffet" height. Any thoughts on that idea?

Friday, September 24, 2010

Funny

Have you ever heard of Wordle? I guess I had, but I had never played with it until today. I submitted my blog URL to make the word cloud, and this is what I got:


Wordle: my blog


Funny, right? I guess I talk about paint a lot.

Thursday, September 23, 2010

Fixing an Old Project

Last year I bought this great side table at the Salvation Army for cheap that I intended to use in my office (see that post here). 
Original condition. It had significant water damage and lots of drawings on it.

Well, it never made it there-- I ended up painting it white and using it as a side table in my living room.
After the paint, before the poly
 At the same time I polyurthaned the top of my desk, I decided to poly the this table. Well, I don't know if I put on too much, or if this is just how poly works on white paint, but it turned it yellow. Yucky yellow that behaved very strangely with the sun. 
The yucky yellow, just after I started painting

Yucky yellow
Given my recent spat of painting things with my awesome $5 gallon of white paint, I decided I should sand down this table, and then repaint it with the bone white $5 paint. And I am SOOO glad I did! It looks so much better.
Another note-- While I was at Lowe's buying some more sandpaper (I've been using tons of it recently) (no, I don't have a mouse sander yet, I hope Santa is reading this!) I saw paintbrushes. And not just any paint brushes, but Purdy paint brushes. I have read about these on other blogs but their price scared me away a bit- I tend to buy many cheap brushes and just throw them away. I'm sure my projects have suffered as a result. Well, I decided to buy some Purdy brushes because they had a really good deal--a pack of three brushes- 1 inch, 1.5 inches and 2 inches for less than $20! If you were to buy them separately, just the 1 inch and 1.5 inch brush would have been more than what this pack of three was! I think it was a sign that I am meant to use these brushes. My overall impression is that they are excellent. Very good paint coverage and they cleaned easily. I also liked that the handle is wood. My old arthritic hands wouldn't mind thicker handles, but they'll live.

Ok, back to the point here. The table now looks awesome.


See! No more yellow!

The bad news is that I also used poly on my desk. And it turned the same yucky yellow. This weekend I am planning to sand that down and repaint. I haven't decided if I will repaint with the original color (called white mocha), since I only put poly on the top, or if I will go crazy and repaint the whole desk with bone white. I'm kind of torn--the bookcase in my bedroom is bone, but painting the whole desk is a big undertaking. Since the two pieces aren't next to each other, I can't imagine anyone will notice unless I tell them...


Shared on Remodelaholic

Monday, September 20, 2010

More Painting

With my new open floorplan apartment comes the need for changing up my furniture a bit.  One of the spaces I've had the most trouble with is the dining area. Its big. Much bigger than I need, and bigger than I furniture to put in it. I know that I don't need to feel every empty space, but this just seemed a little ridiculous. 
The dinning area, on the left, with an empty apartment
Shortly after moving in. Random totes still not unpacked.
Shortly after moving in, from another angle.
Eventually, the black table that I had in my living room at the old apartment was placed against the wall facing the kitchen.
Remember this guy?
I wasn't really digging the combination of my light colored table with this black table, so again my $5 gallon of white paint came to the rescue. Prime, 2 coats of bone white, and voila, good as new. Now, to actually hang the mirror on the wall, or leave it leaning like it is now?


Wednesday, September 15, 2010

Easy Upgrades with Paint

You may have noticed a change in my bedroom in the before and after pictures of my last post that I didn't mention.
Before:

After:

Do you see it??

Over on the left side of the picture-- the bookcase. This mirrored bookcase was given to my by my grandfather many years ago-- I'd say at least 12 years ago. It was unfinished, but ok that way, and I was never sure what color I wanted to paint it. It actually lived in my room at home in Vermont until May, when my family brought it out for me while visiting for my graduation.

Since I'm digging the contrast between the white things in my room and the grey walls, I decided to paint it white. I already had this paint-- so the project cost me $0. I used a color called "bone white." It's the paint I got for $5 from Ace in the winter, which I used to paint my cabinets in my old apartment

I unfortunately don't have any action shots of painting the bookcase, but it was really easy and straight forward. I taped off the mirrors so I didn't paint on them, and then got to painting. The bookcase is pine, and had some knots, so it took 3-ish coats to really cover well.

Before:                                                After:                                          
 

Sunday, September 12, 2010

Headboard Cost Breakdown

It occurred to me that I never detailed the cost of my headboard project. I want to share, so you all can see how inexpensive it is to make your own.


Fabric- 2 yards @3.50/yard =7.00
batting- twin sized, regularly 9.99, but used a 40% off coupon= 5.99
foam- 2 twin sized egg crate foam toppers @9.99 each= 19.98
Plywood- 4x8 ft sheet @15.46

total= 58.43

Already had- staple gun, staples, nailhead trim

Also, I have more than half of the plywood left over for other projects. I probably could even make a smaller headboard for someone else.

Not bad, considering similar headboards are at least $250 (even at Target). 

Thursday, September 9, 2010

Headboard!!

I've been talking about wanting to make a headboard for my bed for quite a long time. For some reason I was under the impression that it would be an expensive and difficult project to do, so I was putting it off.
Well, with a new apartment, newly painted bedroom, and a 3 day weekend for Labor Day, I decided it was time. You might remember my bedroom as it was without the headboard:


I decided on the dimensions I wanted for the headboard-- 34 inches high and 54 inches wide (the standard width of a full sized bed). This is the size plywood I will need for the project. Knowing that most fabric is 45 inches wide, I knew that about 2 yards of fabric would be good, I already had nail head trim, so I just needed foam and some batting. 
So I headed to Joanns. I wanted to use a neutral, solid color so that the headboard would go with virtually any colors I had in my room. I really, really lucked out at Joanns- I found some tan suede-ish "home decor" fabric that was on the clearance rack. At Joanns, I also picked up batting intended for a twin-sized blanket, and then headed to Target to get some foam. Regular foam by the yard is extraordinarily expensive for some reason. I had seen some other projects where people used foam mattress pads instead, and I found that was a much more economical way to go. Finally, I got a sheet of 1/2 inch plywood at Lowe's. They cut a piece to the size that I wanted, and then cut the left overs so it would all fit in my car.

When I got home, it was all about stapling. I have a manual staple gun...which worked for this time, however my hands were quite sore when I was done. If I were to do this again, I would most certainly get an electric staple gun. Apparently I was so excited when doing this project that I forgot to take any "action" shots. But theres hardly any difficult steps here. I laid out the batting, put the foam on top, and then the board. I cut the foam to the size of the board, and then wrapped the extra batting around the back of the board, pulled tight, and stapled it on. Then I went through the same process with my freshly ironed fabric. Not too hard, since there is no pattern in my fabric. The most important thing is to pull the fabric tight enough.
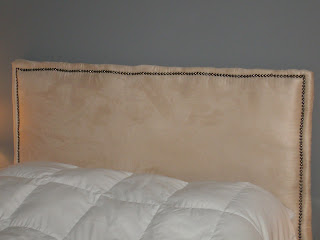
The last step was to put on the nail head trim. It was harder than I imagined to keep those little buggers straight, but in the end, I'm very, very happy with the result!


I decided to go the route of hanging the headboard on the wall (it's really not much heavier than a large mirror) instead of trying to make feet for it. I just used two heavy duty picture hangers, one on each side.


Of course, once I had the headboard up I thought the wall above the light on each side of the bed looked really empty, and the bed was rather white/tan. So I went on a search for mirrors or some other decorative accent for the wall, and some throw pillows. Unfortunately, I didn't find any pillows that I was interested in buying, but I did find something for the wall.


These are actually picture frames, which I found at Pier 1. They came two together, with a spot for a 4x4 picture. Since I wanted mirrors originally, I decided I would just put a mirror in the spot for the picture. I got some mirror sheet at Joanns (instead of actual mirrors, because the mirrors were both not the correct size but also would have been too thick to fit into the frame) and cut it to the correct size. You would never be able to tell that it's not a "real" mirror, its awesome!


So I'm still on the lookout for some throw pillows. Or perhaps I will just make some??

Sunday, September 5, 2010

Frames: Before and After

As part of my gallery wall, I bought a frame and a mirror at the Salvation Army. The frame was for a picture that was previously in a silver frame, which didn't fit with my plan.
Here is the frame before, with the beautiful artwork that it came with:

And since I was so enjoying painting outside on the balcony, I forgot to take a true before picture of the mirror. So here's a "just after I started painting" picture:

The gold frame took several coats and sanding between coats to make it look the way I wanted. The mirror was much easier.

The gold frame is in the middle in the picture below. I put a picture of my dad and his wife, my sister and I from my dads wedding last summer.

And the mirror:


It's really hard to get a good picture of a mirror!
This just shows how easy it is to take cheap frames from thrift stores and make them into something you'd be proud to display!