Sunday, August 14, 2011

Glittered Heels

For a while, I've been obsessed with glittered shoes. Kitten heels, pumps, open toed pumps...Kate Spade, Jimmy Choo, Mui Mui....
The problem with this is I can't afford to buy a pair of Kate Spade shoes...but even more, I'm unsure how practical they will be for "everyday" wear, which is the test I put all of my clothing and shoes through. 

Glitter Heels

Christian Louboutin platform pumps
$895 - bergdorfgoodman.com

Christian Louboutin glitter pumps
$805 - mytheresa.com

Miu Miu glitter pumps
$476 - bluefly.com

Jimmy choo shoes
$495 - shirise.com

Betsey johnson shoes
$119 - betseyjohnson.com

High heel shoes
$120 - topshop.com


JustFabulous glitter pumps
$50 - heels.com

I've seen a couple DIY glittered shoes around the internet, and I decided to try it myself.
I had a pair of shoes I felt were good candidates, but I liked them as is too, so I set out on a hunt for affordable shoes to glitter. I went to the Salvation Army, and as luck would have it, I found an awesome, brand new pair of black opened toe ankle strap pumps. 

I bought them, but by the time I got home, I was already unsure that I wanted to glitter them, as I loved them in their current state. Also, the ankle strap and heel height made them slightly more dressy than I was intending. So, I decided to glitter the original heels and keep the "new" ones I had bought black! The shoes I ended up using are from Target, from a couple years ago. They're comfortable and I actually have them in two colors. 

All you need for this project is a pair of shoes, some glitter, modge podge, a little newspaper and some clear enamel spray paint.
 It was beautiful out that day, so I decided to work outside on my balcony.


Mix some modge podge and glitter- I used Martha Stewart's smokey quartz glitter, bought at Michael's for $3.99. I really just eyeballed it, no exact recipes here.

First Coat 
It took me about 4 coats to achieve the level of uhh...glitteirness that I wanted. As you can see, I also glittered a barrette I had laying around. I find when I have glue and glitter mixed, and even a little bit left over, I get giddy looking around trying to find something else to glitter.


I stuffed some newspaper into the shoes to protect the insides, and then sprayed a coat of clear enamel that I bought at Ace Hardware, also for $3.99.


Voila! The finished project. Prepare yourself, friends. I will be wearing these around town starting tomorrow morning!


Thursday, August 11, 2011

Sewing: Simplicity 2258

This might just turn into a sewing blog--sorry guys :)
Well really, I started this blog just as an easy way to show my friends and family what I had been up to, since I live almost 1000 miles away. I like doing all kinds of different projects (sewing, painting, upholstery, crafting) and apparently I go in spurts!

For this project, I decided to step away from my trusty pencil skirt pattern and try something new. I picked this pattern, Simplicity 2258. I liked the tie on the skirt and the pockets, so I decided to give it a try with this pink bottom weight fabric I got (at Joann's, of course).


The pattern was not hard, and I think my version looks a lot like the picture on the envelope. I used the style of version c (the tie, essentially) with the length of version B. I wanted it to be work appropriate, and I was afraid version C would be too short. Unfortunately, I ended up with a skirt that was kind of too big- definitely not as well fitting as the one on the model there. I have worn it to work a few times, but I really need to take it apart and make it smaller, and perhaps a smidge shorter. I'm working on my fitting issues, but its really a work in progress. 


Would I make this again? Absolutely. Maybe when I get brave I will try it with a silky fabric! And I'll try to make it fit properly.


Monday, August 8, 2011

Since summer is going to start winding down very soon, I thought it was probably time to show you what  I did with my balcony this year.
Since I moved here in August last year, I only had a couple short months to use my balcony and then it was winter, so I was kind of starting from scratch this year.
I did find a nice little table at the end of last year, and repurposed a chair I previously used inside for more comfortable seating.

Just to refresh your memory- above is what my balcony looks like. I have two sliding doors- one in my living room (on the right) and one in my bedroom (the left). This is my first outdoor space and I am totally tickled with it.

I wanted to make the balcony more like an outdoor living room for this summer, and I wanted to think about decorating it like a room in my apartment (for some reason this is a strange concept to me. All my decorating knowledge goes out the window when I go outside)


In making the balcony a little more cohesive, I decided to first recover the little chair I had outside. 
Bad pic, sorry. It's the only one I can find!


This chair came from Ikea and originally had a red seat and flowered back cushions.
My sewing skills have definitely improved since this project, thanks to practice and a new machine!
One of my first sewing projects nearly 2 years ago was recovering it with some green geometric fabric. But this time I decided to go with purple ikat, an outdoor canvas from Joann's. 


The cushion is actually a box cushion, I made it with 3 pieces- top, bottom and the piece that goes around. I put invisible zippers in the pillows, but wasn't able to find a long enough zipper for the seat cushion, so I did it the old fashion way. It's hard to tell because the table is in the way, but this cover fits WAY better than the last. 

I also decided to re-purpose a bookcase I had inside as a plant stand outside. It was a dark brown color, but had seen better days. I decided I wanted to go with a contrasting color for the bookcase, so I picked out a rusty orange color at Ace Hardware. I only needed one paint sample to complete the bookcase.
Bookcase in previous life (stay tuned for an
update on that chair as well)
Bookcase now!

I put out the plants I had on hand that can handle the outdoors, all of which are in my white planters. Some of the planters are from Ikea, others are from a local gardening store. Overall, I think the white on orange is pretty spiffy, and the purple and orange go together swimmingly. I think I have made good progress with making my balcony feel more incorporated into my apartment and have got a ton of use of out it so far this summer.


I thought about making chair pads for the little bistro set that I have neglected to take a picture of (and its now too dark...), but in the end I decided that might be overkill, plus the chairs are fine as they are.
I would like to do something with that black table I have in front of the chair. Its placement more as a coffee table than a side table has been really convenient, but it doesn't really fit the feel of the rest of the space. Paint it, or make something else to go there?

Tuesday, August 2, 2011

Sewing: Simplicity 2593

Simplicity 2593 is a Cynthia Rowley pattern (that apparently just went out of print--when I bought it about 2 months ago it wasn't out of print but it appears to be now). I am enjoying making skirts and dresses but I wanted to try a new type of garment, and I really liked the twisty neckline on this particular top.

I had picked a fabric that is a little out of character for me, a bright large floral pattern that I got at Jo-Ann's. I thought the pattern was reminiscent of Liberty of London patterns, but without the price tag.
The hardest part about the pattern was getting the collar to sit properly. If/when I make this pattern again I think I would do it differently. Regardless, after I finished, I had a photo shoot on my balcony.

Below you will see my grey cat, Eleanor on the balcony railing. She is my little gymnast, balance beam specialist. Scares the crap out of me sometimes but she's never fallen.


There was some bird poop on the railing. Guess I should clean that up, or hope the rain does it.
 
I look so skeptical in this photo. I don't know why.


Thursday, July 21, 2011

Poof! A Pouf!


Poufs. They're expensive. Why? I don't really understand. They start at about $150 and the sky is the limit from there. This doesn't really fit my style or my budget, so I pursued other options, like making my own.
Moroccan Pouf, Pouffe, Ottoman, Poof, Color : SilverMoroccan Leather Pouf Green Moroccan Poufs OttomanMoroccan Pouf, Pouffe, Ottoman, Poof, Color : Fushia
I was inspired by various DIY pouf projects I've seen on Design*Sponge, Apartment Therapy and more. 
Design Sponge
Amy Butler Patterns-Honey Bun Poufs
When I saw a post on Welcme to Heardmont about a "Pouf-A-Long" I knew it was time to act. 

I decided I wanted to use this tutorial from Bromeliad.
From Bromeliad

I really dig the metallic poufs I have seen, so I decided to search out metallic fabric options for my pouf. One day in Joanns, I stumbled upon the pleather section, where I found some snake skin textured metallic silver pleather. This fabric is intended for apperal. I can't imagine a situation in which someone would want to wear this fabric....

I bought 2 yards for this project, and at $15 a yard, I think this was actually my most expensive fabric purchase to date! Of course I used a 40% off coupon, so I didn't pay full price.

The pieces I cut looked like this-- I made a pattern based on the directions on Bromeliad, using pieces of paper taped together to be the correct size.

I sewed the pieces together as described in the tutorial, and then was ready to stuff it. I put in a few things while looking around for appropriate filler. My cats really enjoyed the opportunity to explore inside the pouf. Perhaps this is a project in the future for the cats! When they came out of the pouf after napping in there, it was like they were hatching. Pretty hilarious. At one point I didn't realize there was a cat in the pouf and then it started moving and making noise. Freaked me out good for a second, until a furry head popped out!


I originally thought I would use comforters that I could get for "cheap" from the Salvation Army, but I was shocked when I got there to discover that the comforters were like $20 each. I knew I would need 2-3 of them, so that didn't seem like a good option. In the end, I decided to go with a combo: old sheets I had around, some clothing I was intending to donate, and a 20lb box of fiber fill that I bought at Joann's with a coupon (I'm seeing a pattern here). The fiber fill was the only thing I actually bought, and that cost me about $10. I then made a medallion to go on top and attached it with some super fancy hand stitching. 
And Poof! It's a pouf! I intend to eventually have it outside on my balcony, but its kind of late here and also about 100 degrees out right now, so these inside pictures will have to suffice for now!


The kitties approve, even if they can't burrow in anymore.

Tuesday, July 12, 2011

A Dream Come True!

Over the July 4th holiday, I went thrifting, and found my DREAM piece of furniture. A Thomasville Faux Bamboo dresser. For $45. I'm in love. 

Now to decide what color to paint it. 

(PS, Am I the only one who didn't know these dressers are actually vintage? Given the shape it is in and their popularity I figured they were a product of the 1990s, but apparently this baby is straight from the 60's??)

Friday, July 8, 2011

Paint and Repaint

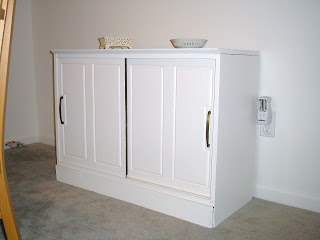
Back in September I bought and painted white a little cabinet for storage in my dining area. Well, it quickly got moved to behind my couch, to serve as a landing strip for mail, keys and other stuff that I have in my hands when I walk in the door.

I decided that while the white was nice, I needed a little punch of color in my life. Looking around at the other things in my living space, I decided turquoise was the color I needed. So I repainted this white cabinet with "La Fonda Turquoise" from Valspar.


I think the color really brightens up the room. It's one of the first things you see as you come up the stairs into my apartment, and it definitely makes a statement. I love it!


 This cabinet is actually small enough that I used just about 1.5 paint samples, making it extremely affordable. I had the first sample in my stash already for a previous project, so that was already paid for. I only had to shell out about $3 for this project!

Linked to: