There are also some really funny parodies. I am a very sarcastic and dry witted person, and I intended to write this blog in that tone as well, however I realize it doesn't always come off the way I intend, so I have really switched my tone. (and the design--when I first started my blog my header was a picture of Ms Dickson herself) Plus, it turns out I occasionally actually have cool things to write about, not just sarcasm. So now, whenever you visit my blog, imagine Brenda greeting you with "Well hello! and welcome to my home!"
Thursday, February 10, 2011
Where did the name for my blog come from?
I call my blog "Welcome To My Home" which actually sounds quite related to home decor, right? Well, the name came from everyone's favorite 80's Soap Opera star-- Brenda Dickson. You see, Brenda has an amazing video that starts "Well hello!and welcome to my home!" and then goes on for about 20 minutes talking about her wardrobe, diet, exercise, organization for her house, etc. This video is HILARIOUS. I originally saw the video on YouTube, but Brenda herself has since exercised her copyright rights and removed it. She did re-release it for purchase in 2009. Here is a teaser for those of you who haven't seen it:
Thursday, February 3, 2011
Oh boy!
My RAST dresser hack was featured on one of my favorite blogs (and the inspiration for the project!) Effortless Style!!
Thanks Camilla!
 |
| Ellie also approves! |
Thanks Camilla!
Wednesday, February 2, 2011
This plus That
What happens when you combine these awesome napkins with this dresser?
 |
| Napkins from Effortless Style, Ikea RAST dresser |
This!!

Once I assembled the RAST dresser, I primed and painted it white. Remember my bottomless $5 gallon of paint? Well, it strikes again!

I'll be honest, figuring out how to best get the greek key pattern onto the dresser was not easy. I first tried with tape and a ruler, and I just couldn't get it right. I started with taping the edges, and then the corners. Fail. No good. And add to that, the original paint color I picked was NOT what I was thinking. Paint has a nasty habit of not looking the same in real life as it does on the paint chip.


So more primer/white paint, and back to the drawing board. In the end, my trusty old graph paper came to the rescue. I created a template with the graph paper, cut it out, and then traced it lightly onto the drawers. THEN I used the tape to make it easier to paint.
 |
| The Stencil in action |
 |
| Added some paint |

The paint I used was this Valspar paint, called "La Fonda Turquoise". The sample size that I got is far more than enough, I will be able to use it for other projects.

Heres a comparison with the original color I picked- a color called Turquoise Bay by Ace.

And the nearly-final product (just missing some knobs):

Finally, I put it in place next to my bed. I am really happy with the way it looks in my room, and how it makes my room feel much bigger. My previous nightstand extended out too far along the side of my bed, and took up a lot of space. In retrospect, that table was definitely supposed to be a side table for a sofa, not a nightstand. Oh well.


Linked to:


Friday, January 28, 2011
Next Stop of the Bandwagon: My Home
Yes, I jumped on the Ikea Rast dresser redo bandwagon.
I just can't resist the amazingness of the various Rast dresser redos I have seen. For those of you who aren't aware, the Rast dresser is an unbelievable $29.99 at Ikea. It's an unfinished, 3-drawer small dresser and totally awesome.

It took me about 30 minutes to put together, and then I immediately primmed her. I'm still working on the final product so I'm going to keep my design plans quiet for now.
I just can't resist the amazingness of the various Rast dresser redos I have seen. For those of you who aren't aware, the Rast dresser is an unbelievable $29.99 at Ikea. It's an unfinished, 3-drawer small dresser and totally awesome.

The possibilities are endless. Here are a few makeovers of this dresser I have been drooling over:
 |
| Source |
 |
| Source |
 |
| My Rast... |
My Mother's Dinning Room
I have been holding off on showing pictures of the redo from my mother's dinning room and kitchen for some time now because I am waiting for pictures of the kitchen. (Ahem, are you reading this, sister??)
But I can wait no longer, so I will show you the dinning room today. I call it the dinning room, but its really just an extension of the kitchen with a table in it. We also have a formal dinning room, but that is used more as a sewing room.
I painted the dinning room many, many years ago for my mom, after removing the old wall paper. I really don't know exactly when this happened, but it was before Prom of my senior year of high school. I found a highly amusing picture of myself on Prom night in the dinning area, with the wall behind me painted.
My mother loved the color I had picked out for the kitchen (and I had bought about twice as much as we needed) that we used it in the dinning area as well. I think this was actually a good idea anyway, as they are essentially one room with a bar separating them.
The before color is a decade-old color called Parchment. I don't know what brand it is if you're interested in making your dinning room look circa 2001, but it is probably Glidden. Considering the crazy 70's era wallpaper that was there before, this is a huge improvement.
The "parchment" paint really lightened up and cleaned up the room. We were in the process of a deep clean at the time of this picture, which explains the covered table.


But I can wait no longer, so I will show you the dinning room today. I call it the dinning room, but its really just an extension of the kitchen with a table in it. We also have a formal dinning room, but that is used more as a sewing room.
I painted the dinning room many, many years ago for my mom, after removing the old wall paper. I really don't know exactly when this happened, but it was before Prom of my senior year of high school. I found a highly amusing picture of myself on Prom night in the dinning area, with the wall behind me painted.
 |
| The dinning room and I, freshly painted circa 2004 |
The before color is a decade-old color called Parchment. I don't know what brand it is if you're interested in making your dinning room look circa 2001, but it is probably Glidden. Considering the crazy 70's era wallpaper that was there before, this is a huge improvement.
 |
| The dinning area, my brother and grandmother, circa 1998 (Brother is now 14!) |


And After: Again, this color is Silverleaf by Valspar.


I think the color kind of reads blue in these pictures, but its definitely more grey in person.
The black candle holders are new, as are the mirror tiles. My mom had really, really old candle sconce and mirror set on the wall that just needed to go.
Another thing we need to work on is the curtains. I couldn't find the Young House Love style white breezy curtains I wanted in my quick trip home (strange, right?) and didn't find any other suitable alternatives in stores, so I left the curtains as is.
I would love to see something with a subtle pattern and perhaps bamboo instead of those plastic blinds,

or maybe just roman shades, as I don't think those blinds ever get pulled down.
Perhaps someday soon I will have pictures of the kitchen!
Wednesday, January 5, 2011
A Christmas Present
While I was home for Christmas, my intent was to tackle one big project--the kitchen. I really wanted to paint the kitchen cabinets, the walls and perhaps the countertop. Well, it didn'tgo exactly as planned. First, we decided 7 days wouldn't be enough time to properly sand and prime and paint all the cabinets (theres quite a few...), and I was unsuccessful in convincing my mother that painting the floor and/or counter top was a good idea. So what did I do?
Well, I DID paint the kitchen. You're going to have to wait to see pictures of that. We primed and painted the walls, and also gave the ceiling a fresh coat of white paint. But since that didn't really take up my whole week or all of the paint we had, I started looking around for other things to paint. One room that hadn't been updated in a while was the entryway/mud room.
This room was papered shortly after we moved into the house by my mother. She chose a trendy hunter green almost solid paper. It was looking dated, and also my mom runs an in-home daycare center, and the kids had done a little peeling in some spots.


 |
| My little helper There were TWO layers of wallpaper. The green and a lovely 70's style flower pattern |
So I got to work with my friend the wallpaper steamer and one of my mom's daycare kids one afternoon and stripped all that wall paper! If you have to remove wallpaper and you don't own a steamer, I seriously recommend it. Once the water heats up, you apply it to the paper, and it works miracles so the paper just easily falls off. I have used vinegar and hotwater in a spray bottle, and also fabric softener and hot water. Both of these things work OK if the wallpaper is just going to come off easily anyway. But I really don't like how the water gets cold quickly, and then the paper you've scraped off is soggy and cold. Gross.
So yes, this little ~$50 steamer is DEFINITELY worth it.
 |
| Buy it here |
Here are some in progress pics. After removing all the wallpaper, we washed the walls to make sure any left over pieces of wallpaper were removed. We let the wall dry a little, and then spackled some holes and let it dry overnight.


 |
| Daisy helped |
So what color did we use? Well, I had originally picked out a color from Lowes in Michigan by Valspar called Silverware (spoiler: this is the same color that I used in the kitchen and dinning area. Mom liked it), but the Lowes at home(Vermont) had different color chips and didn't have "Silverware."

Instead I found a really close match called "Silver Leaf."


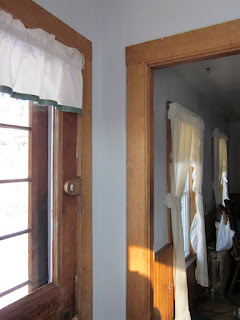
It's really hard to take pictures of this tiny tiny area. These were the best I could do.
Further considerations: painting the trim white? Sanding and refinishing the door? The door is original and the previous owners of the house went to great lengths to strip the many layers of paint to get it back to the natural wood, so my mother is unwilling (at least at this point.. I haven't pushed much) to paint it white. But she has agreed that we could sand and re-stain it the next time I visit home (probably in the summer).
Overall my mom was really happy with my Christmas present for her!
Before:
After:
Subscribe to:
Posts (Atom)